Here’s how to run a Node on Pi Network.
Running a Node adds to your daily mobile mining rewards.
Once set up, it’s recommended as your mining rewards will increase without extra effort.
(Reports indicated that the infinite loading issue was resolved around March 2, 2024. If you had previously stopped the setup, we recommend doing so now.)
→ The infinite loading issue has been completely resolved. Normal operation is possible.
Addendum 2024/10/19
A version update (0.5.0) was released on October 17.
The installation method is basically the same as below.
The content has been updated to match the latest version, so please follow the steps.
For details on the latest version update, please refer to the article below ↓.
Pi Node 0.5.0 Beta Update: Latest Information and Notes
https://pinetwork.masters-all.com/pi-network-new-node-version/
Version 0.5.1 was released in February 2025. The version update is automatic.
Pi Node Latest Version v0.5.1: Importance of Mainnet Migration and Operation
Japan is currently ranked 4th in the world ranking for running Pi Nodes.
We are gradually climbing the ranks and aim for the top spot.
(As of 2023/6/11)

If you haven’t joined Pi Network yet, please join from here.
https://pinetwork.masters-all.com/start/
Addendum: As of March 3, 2024, we are ranked 2nd with 30,382 nodes.
Advantages and Disadvantages of Running a Node
Advantages of Running a Node
A Node bonus is added to the reward you receive when you tap the mining button daily. (In the administrator’s environment, it was about 6.4 Pi per day at the time of writing.)
Also, you can contribute to Pi Coin transactions. By running a Node, transaction records of the same content are distributed among each Node (PC), which helps prevent fraud.
→ After 1 year and 2 months of operation, the reward increased to about 8.8 Pi per day.
→ After about 3 years of operation, the reward increased to about 11.6 Pi per day.
Disadvantages of Running a Node
Running a Node assumes that your PC is kept running 24 hours a day without going into sleep mode. This will increase your electricity bill, but it’s good to operate it as a forward investment in the future potential of Pi Network. You can also run the Node only while you are using the computer without running it 24 hours a day, but the rewards will be limited. The electricity bill depends on the PC’s performance and your electricity contract, but it is estimated to be around 1000 yen per month.
About the Computer Required for Running a Node
In the administrator’s environment, I can earn about 6.4 Pi per day, but the reward will be lower with a PC with low CPU performance (I tried with a low-performance sub-PC and barebone). The administrator initially ran it on an old spare PC, but the reward was less than what others reported, so I was able to get this much reward per day by running the Node on my main PC (gaming machine). Also, no matter how high-spec a computer you use, the highest reward is around 20 Pi, so if you are currently receiving around 11.4 Pi, you are probably getting a sufficient amount. Running a Node does not require a high-spec PC, but rather a certain level of CPU performance and a stable network environment for continuous operation.
(Reference) Administrator’s Main PC Specs
Processor AMD Ryzen 5 3600X 6-Core Processor 3.79 GHz
Installed RAM 32.0 GB
System Type Windows 10 64-bit Operating System, x64-based Processor
What You Need for Mining
・Computer (Windows or MAC)
Install the software required for Node operation on your computer. A high-spec computer is not required. Either a laptop or a desktop is fine. Heat emitted from the PC can cause malfunctions, so it is recommended to choose a desktop PC that can handle heat dissipation. This article introduces the installation method for Windows.
・Electricity Bill
Electricity costs will be incurred while the computer is running.
Power consumption varies depending on the computer you run, so please check if you are concerned.
・Stable Network Environment (*Port forwarding is essential to get high rewards)
Connect your home fixed line to your computer. Mobile lines and mobile data lines are not considered stable network lines and are not suitable for Node operation. Also, since about 1GB of data is communicated per day, mobile data lines will quickly use up your data, so a fixed line with no usage limit and port forwarding capability is recommended. If you are considering a new internet contract for operation, please check if port forwarding is possible before signing the contract. It would be disastrous if you find out after signing the contract that port forwarding is not possible.
Please refer to this for recommended fixed lines
https://pinetwork.masters-all.com/node-internet/
*About Port Forwarding
Port forwarding is essential for distributing the ledger. You can run a Node and earn rewards on a line that does not allow port forwarding, but you cannot earn much. Also, mobile lines often do not have a global IP address, so port forwarding is not possible. Please check.
Check the Flow of Node Setup
The time required for setup is about 30 minutes to 1 hour.
① Check if port forwarding is possible and set up port forwarding
Check if the internet line you are subscribed to allows port forwarding.
If the line does not allow port forwarding, you cannot run a Node, so be sure to check if it is possible before proceeding to the next installation. Even if port forwarding is not possible, you can still receive a Node bonus, but the reward will be small.
② Fix IP address, fix firewall
Fix the IP address assigned to your PC. The IP address changes every time you restart your PC, so fixing it prevents port forwarding issues.
③ Router port settings
Set up port forwarding for the fixed IP address.
④ Install and set up Node software
Install and set up the software required to set up the Pi Node.
⑤ Install and set up Docker
Install and set up the software required to run the Pi Node.
⑥ Remote control software settings (optional)
Check the PC screen from your smartphone in case of computer trouble during Node operation. Operation is possible even without this setting.
Other: About changing PCs
Explains the necessary steps to switch operation to a higher performance PC.
Other: How to improve network quality
To operate the Pi Network, you need to have high network quality. Explains how to improve it.
Set up Pi Node
If you are running the Node without port forwarding, please skip to the Node installation section.
Check if Port Forwarding is Possible and Set up Port Forwarding on the PC Side
Check if Port Forwarding is Possible
Check if the internet line you are subscribed to allows port forwarding.
To check, use search engines like Google or Yahoo and search for
your provider name + port forwarding. You should find websites explaining how to open ports. This article explains how to open ports with Rakuten Hikari. If you cannot resolve the port forwarding method with this article, please refer to the explanation sites found on search engines. Port forwarding may be an unfamiliar term, but it is something that people who play online games or run servers at home set up, regardless of Pi Network, so you should find explanations from a wide range of people. Even if you set up the Node operation software, if the line does not allow port forwarding, the setup time will be wasted, so please check if it is possible in advance. As mentioned above, it is difficult to open ports on mobile lines, so set it up on a fixed line.
Port Forwarding Settings: Fixing the IP Address
Once you have confirmed that port forwarding is possible, you will actually set up port forwarding.
In a typical home environment, the IP address changes automatically every time you start your PC, so you need to fix the IP address. If you don’t fix the IP address, you will have to set up port forwarding every time, so be sure to fix it.
Check Line Information
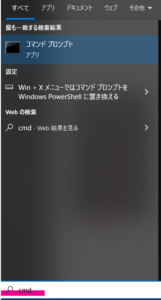
Press the Windows key in the bottom left and type “cmd”.
Then, Command Prompt will appear in the search results.
Click on it.
(Command Prompt is a tool used to check the status of your computer)
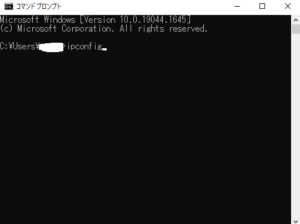
When you click, a software with a black screen will start.
Type ipconfig and press Enter.
(The part erased in white is the PC name)
When you press Enter, the network information that your computer is connected to will automatically appear.
Pick up the network information from this.
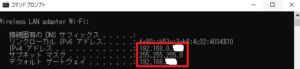
For wireless LAN connection: Wireless LAN adapter Wi-Fi
For wired LAN connection: Ethernet adapter Ethernet
The network information will be displayed.
My environment is wired LAN, so it is displayed as follows.
Note down the information in the red-boxed area that is displayed, or keep this screen open.
You will use this information in the next step to fix the IP address.
Settings to Fix the IP Address
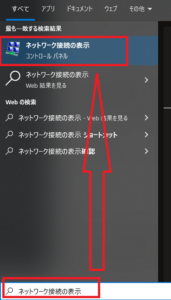
Press the Windows key in the bottom left and type “View network connections”.
Then, the menu enclosed in red will appear in the search results.
Click on it.
If you cannot do this,
Click on Windows key → Gear icon → Network & Internet → Ethernet → Change adapter options in order to reach the same screen.
A screen like this should be displayed.
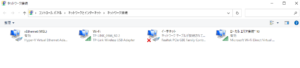
Now, fix the IP address for the network you are currently connected to.
If you are connected via Wi-Fi, Wi-Fi will be displayed. If you are connected via wired LAN, Ethernet will be displayed.
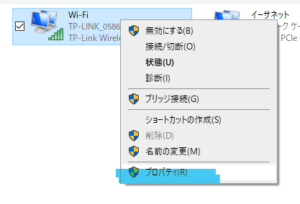
Right-click on the connected network and click Properties.
When you click Properties, a screen like this will appear.
First, uncheck the box to the left of Internet Protocol Version 6 (TCP/IPv6). (If it’s already unchecked, that’s fine. Unchecking it can prevent one cause of port forwarding issues.)
Next, click on Internet Protocol Version 4 (TCP/IPv4) and press Properties.

When you press Properties, the following screen will appear.
Here, you will use the network information that was displayed when you typed ipconfig earlier.
Set the options from top to bottom.
① Check “Use the following IP address”.
② IP address: Use an arbitrary address.
Fix the red-colored part below with a number you like.
Example: 192.168.0.199
↑ Fixing this part is called fixing the IP address.
If there is someone knowledgeable about networking at home and 199 is already in use, please use a different number.
③ Subnet mask: Enter the subnet mask you noted down earlier.
④ Default gateway: Enter the default gateway you noted down earlier.
⑤ Preferred DNS server: Enter the preferred DNS server you noted down earlier.
When you are finished entering, press OK.
If you make a typing mistake here, you will lose internet connection.
If you lose connection, you can reset it by clicking “Obtain an IP address automatically” on this properties screen. Please try again.
Port Forwarding Settings / Firewall Settings
Windows Firewall is a feature that automatically protects your computer. Once you change this setting, the port forwarding procedure is complete.
Press the Windows key in the bottom left and type “Windows Defender Firewall with Advanced Security”.
Then, “Windows Defender Firewall with Advanced Security” will appear in the search results.
Click on it.

The Advanced Settings screen will open.
Click on Inbound Rules, which is underlined in red.
If the above does not appear,
Click on “Start” → “Control Panel” → “System and Security” → “Windows Defender Firewall” → “Check firewall status” → “Advanced settings” in order to reach the same screen as below ↓.

Click on New Rule, which is highlighted in red.

The New Inbound Rule Wizard will open.
Select Port, which is highlighted in red, and click Next.

Select TCP at the top
Specify the port numbers required for the Pi Network Node in Specific local ports.
Enter the numbers 31400-31409.
Once entered, click Next.

Select Allow the connection at the top and click Next.

Check all options for “When does this rule apply?” and press Next.

Give the rule a name.
Spaces are not allowed, so give it an arbitrary name.
I named it “Port Forwarding”, but it’s best to give it a name that is easy for you to understand.
If you decide to stop running the Pi Node and want to delete the rule, you will search for this name to delete it, so an easy-to-find name is good.

Port Forwarding on the Router Side
Settings are also required on the router side to open ports.
The settings so far were for the PC side. Port forwarding settings are only complete when you can configure the router side for internet connection. The setup method varies depending on the router manufacturer.
I will introduce websites with easy-to-understand explanations that the administrator found, categorized by manufacturer, and provide supplementary information.
・Common settings
① The fixed IP address set on the PC side and the IP address for port forwarding set on the router side must be the same.
② Port forwarding numbers: The port forwarding numbers required for Node operation are 31400-31409.
Some manufacturers require you to specify and set each number individually: 31400, 31401, 31402, 31403, 31404, 31405, 31406, 31407, 31408, 31409.
③ Accessing the router’s administration screen: You can access the administration screen by entering the default gateway number you noted down when fixing the IP address into a web browser (such as Google Chrome or Microsoft EDGE).
TP-LINK
https://www.akakagemaru.info/port/tplink-portfw.html
Please refer to Port Forwarding Method (NAT Forwarding / Port Forwarding Settings).
BUFFALO
https://zedlabo.com/port-buffalo/
Reading from the top down is easy to understand.
NEC
https://www.aterm.jp/support/qa/qa/00020.html
Entering the model name of your router will bring up explanation pages for each model.
ASUS
https://kuritaroh.com/2021/05/18/asus_portopen/
The article is divided by topic. Please refer to the parts you are unsure about.
It seems to be called Port Forwarding instead of Port Opening.
I-O DATA
https://www.akakagemaru.info/port/iode-ta
Introduced by model.
Please look at the explanation page for your model.
If you are using a manufacturer other than the above, or if an explanation page does not appear, search on search engines like Google for
model name + port forwarding, and you should find individual explanation pages, so please search for them.
Check if Port Forwarding is Working
Check if port forwarding is working.
Access the site below to check if the port numbers you set up for port forwarding are open.
https://www.akakagemaru.info/port/tcpport.php
When you access the site, the following screen will appear.
Enter the numbers you set earlier in the port number field you want to check.
Try entering each number individually: 31400, 31401, 31402, 31403, 31404, 31405, 31406, 31407, 31408, 31409.

After entering, the screen will change, and if it is open, the screen below ↓ will be displayed.
This screen indicates there is no problem.

A site that supports Pi Node and can check port forwarding in bulk (English notation)
https://pi-mods.de/nodeports/
Access the above and select Fast or Slow.
Fast should be fine, so just click scan.

Wait a few seconds, and the result of the port forwarding check will be displayed.

Normally, it is said that it is fine if only 31401-31403 are open. If the notation is the same as above, there is no problem.
The following text is written in English at the bottom of the site.
Note: The Pi Consensus container only uses 3 ports (31401, 31402, 31403), the other ports remain closed. The Stellar Dummy Port Test container requires ports 31400 through 31409 to be open.
How to Set up Pi Network Node
Node Software Installation and Setup
Download the Node software distributed on the official website.
Click the URL below.
https://node.minepi.com/node/
You should see a screen like the one below ↓. Select and download the software that matches the computer you are using. (Normally it is in English, but I am using Chrome’s translation function to display it in Japanese.)

The software size is 139MB, so please wait for a while.

Once the download is complete, launch the installation program.
When you launch it, the installation of the Pi Node app will start automatically.

When the installation is finished, you will see the screen below ↓.
Click LOGON in the red circle.

This will be the sign-up screen.
This is to log in with the account you are mining with on your smartphone and the program you just installed.
The screen below ↓ will appear. (The area enclosed in red is the sign-in code. You will use this in the next step.)
With this screen open, launch the Pi app on your smartphone.

In the Pi app, click the three lines in the top left to display the menu, and tap the Node menu item located towards the middle to bottom to open it.
Once opened, a screen confirming sign-in to PiNode will open.
Here, enter the sign-in code.
This code is the code currently displayed on your computer.
Enter the code, which is a combination of English letters and numbers, into your smartphone.
Once you have finished entering, the sign-in will be complete.
Application Response Regarding Node Operation
When you sign in, the screen below ↓ will be displayed first.
Fill in the application form to apply to become a node on the Pi Testnet.
Translating this,
“Fill in the application form to apply to become a node on the Pi Testnet.”
it says.
When operating a Pi Node, there are questions about operation on the next screen.

Question Details
Node Application Form
Please fill out the form below.
Computer type
Computer type
Which of the following computers will you use to run the node?
My primary computer
A spare computer to be used as a node
What type of computer do you use?
・Laptop
・Desktop
・Server
・Other
If other, please fill in the blank: Example: Raspberry Pi
→ Please select the PC you are using.
Laptop means notebook PC.
Operating system
Operating system
What is the operating system (OS) of your computer?
・Windows
・Mac OS
・Linux
Other
If other, please fill in the blank: Example: TempleOS
→ Please select the OS installed on the PC you are using.
Network and uptime
Network and uptime
Is your computer permanently connected to the internet?
・No
・Yes
→ Pi Node operation is based on the premise of being connected 24 hours a day, but please answer according to your home environment.
Is your computer connected via a home router (NAT)?
・No
・Yes
→ If it’s a fixed line, select Yes.
How many hours per day do you plan to run the node?
・24/7, always on
・Occasionally
→ If only while you are at home, please select Occasionally.
Country
Select an option…
↑ Click this to see a list of countries.
Please select JAPAN.
KYC
Are you interested in completing KYC as soon as possible?
Not at the moment
Yes, as soon as possible
→ I want to do it quickly, so I selected Yes below.
When you have finished answering, click SUBMIT.
Then, “Thanks for answering!” will appear at the bottom of the button.
Click the left arrow ← in the top left.
Docker Installation
Install the server required to run the Pi Node.
Click the Node button in the bottom right, which does not appear in the smartphone app.
The screen is written like this.
Technical Preparation for NodeFollow the steps below to install the necessary packages and complete the technical setup requirements to enable your computer to run as a node. All node applicants must complete the steps to participate in a testing and calibration period as part of the node or Super Node selection process. If you have questions while completing the node preparation steps, please visit the github community wiki for answers or join the node applicant chat in the Pi app.
Click the V in the Install Docker section, which has a whale mark.

Instructions for the Docker installation screen will appear.
The instructions are written like this.
“Install Docker. The Pi blockchain requires Docker, a platform for securely building and sharing applications. Docker respects privacy and security and encapsulates all blockchain complexity in “containers” isolated from the rest of your computer.”
Click the red-boxed Download Docker Desktop.

When you press the button, the site to download Docker will automatically open.
Click the part that says Windows in the bottom left of this screen.
It is displayed in Japanese, but I am using the browser’s translation function.

When you click, the download of Docker will start automatically.
It’s nearly 500MB, so wait a bit.
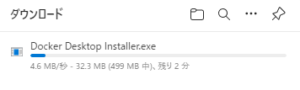
Once the download is finished, launch the installer.
The installation screen will run automatically, so wait.
About 5 to 10 minutes. It may take longer depending on your computer’s performance, so please wait patiently.
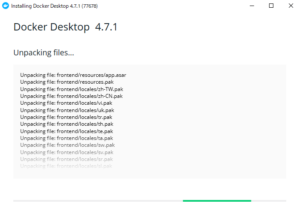
↑ The image is old, so the version is old. When installing, the latest version is fine.
When it finishes, a screen like this will appear.
Press Close.
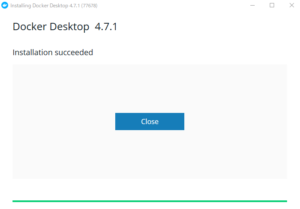
Docker will start after a while.
(If it doesn’t start, click the Docker icon created on the desktop to launch it.)
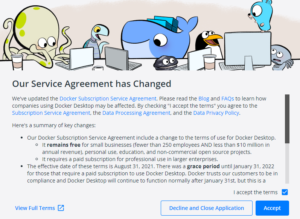
A screen asking you to agree to the terms of service will appear.
If there are no issues, check the box in the bottom right and click ACCEPT.
The screen below ↓ will be displayed.
You will be asked if you want to test if Docker works with a tutorial.
You don’t have to do the tutorial.
If you want to skip, click Skip tutorial.

This completes the Docker installation.
Now return to the Pi Node app.
When you return to the previous Pi Node screen, the display in the Install Docker section should have changed.
This screen indicates that the installation was successful.

Port Forwarding Test
Once you have confirmed the successful installation of Docker, perform the port forwarding test located immediately below.

Screen Translation“Pi nodes communicate with each other via the following TCP/IP ports:31400, 31401, 31402, 31403, 3140431405, 31406, 31407, 31408, 31409Please open these ports in your firewall and, if necessary, redirect the above ports from your router to this computer. A dialog about Docker may appear in the Windows Firewall. If so, you must click [Allow access]. In the future, we will strive to make this step easier.”
This should go smoothly because you already performed the port forwarding test in the first step.
Click CHECK NOW to check if port forwarding is working.
If the three checkmarks on the left are checked, it is successful.
If successful, click Continue in the bottom right.
Node Operation Screen
↓ This screen is the Node operation screen.
Simply keeping this state will keep the Node running.

For Select Environment, please select testnet2.
testnet2 allows you to operate the Node in a new, high-performance, and high-speed environment.
testnet1 is for operating the Node in the old environment. It is expected that eventually only testnet2 will be available.
Screen TranslationTurn on NodeYou can now run the node version including the blockchain. Turning on the switch below will cause your computer to start running the Docker container that executes the consensus algorithm and monitor the Pi Testnet. It will remain on until you turn off the switch. Turning off the switch will stop your computer from running the blockchain. You are a node candidate. We have not yet selected Super Nodes or nodes to participate in the Pi Testnet that need to pass KYC. We will select them soon. Your computer is running the blockchainLocal block number: 194445Latest block number: 194445
The switch displayed here is the part colored green.
Be sure to turn on the switch. Also, there is one more thing to switch on. Please read the part marked (Important) in the Troubleshooting section in the next explanation.
The Local block number is the number of ledgers on your PC at the top. The number at the bottom is the number of ledgers existing on the network. Normally, the number of ledgers at the top and bottom will match. When you first start operating, you need to download the latest ledger to your PC, so it will start from 0. It will automatically become the latest state, so please wait without worrying.
About Troubleshooting Screen Settings
Click Troubleshooting in the bottom right to open the Node operation information.

You can see the current network connection status.
The Node will still operate even if the Troubleshooting screen is displayed, so it is fine to have either screen open.
I have picked up the important information displayed here.
STATE
Whether the current ledger is kept up to date.
If it is up to date, it will display Synced!
Other displays
・joining scp
→ State of searching for other nodes
This notation appears when the Node is restarted or when block synchronization is delayed.
If this notation continues for a long time, synchronization is delayed, so it might be better to restart Docker.
・catching up
→ State of downloading when a download destination node is found.
・synchronized
→ Writing your downloaded block information to the database.
Latest block
The time when the ledger was last updated is displayed.
If it’s a few seconds ago, there’s no problem. Occasionally, it may display several hours, in which case it’s a good idea to restart your PC.
Supporting other nodes
Whether your PC is contributing to updating other ledgers.
If Yes, no problem. If No, please restart your PC.
(Important)
Run the optional blockchain API service
→Pressing the switch here activates the API service function. This contributes to ledger distribution using your PC’s CPU performance. Turning this on allows you to receive more mining bonuses, but it will use more CPU, which can increase electricity costs or bring low-performance computers close to full load. If you are running the Node for the purpose of mining bonuses, checking this is essential. If this causes issues, please turn it off. You will still receive a bonus when it’s off, but it will be smaller.
How to Deal with Delayed Block Synchronization
When running the Node, block synchronization may occasionally be delayed.
You can recognize that synchronization is delayed when the numbers for Local block number and Latest block number do not match.
Also, by looking at Latest block in Troubleshooting, you can grasp the time when synchronization is not occurring.
The larger the number of unsynchronized blocks, the more delayed it is, so you need to take action. (It often fixes itself, but the administrator takes manual action if it is delayed by more than 60 minutes.)
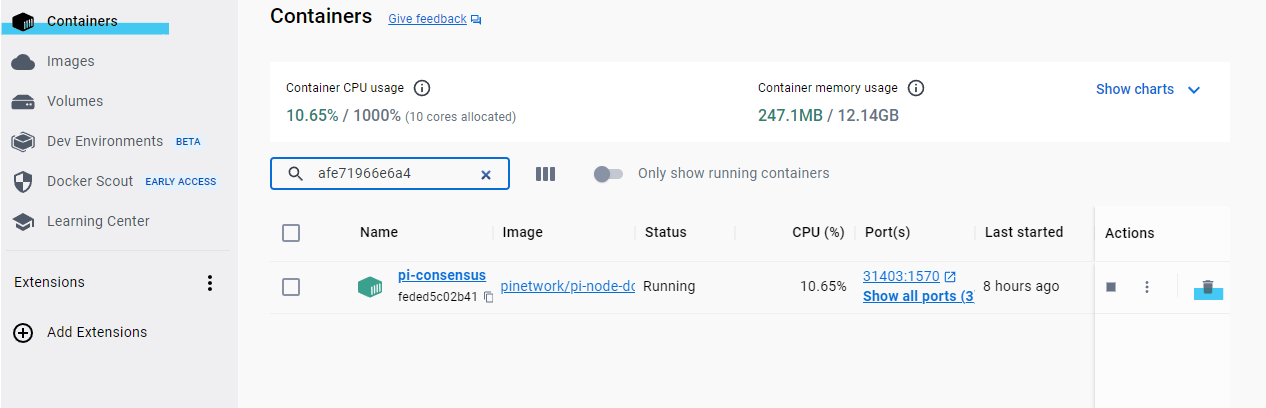
Manual Action ①: Restart the Pi container in Docker.
In most cases, this will fix it.
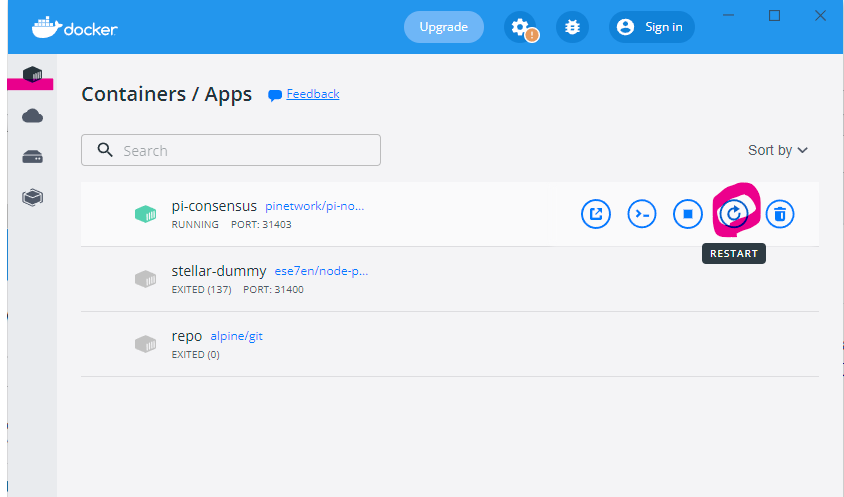
Launch the Docker screen and open Containers/app in the top left.
Move the mouse cursor over pi-consensus within it, and a menu will appear.
Press the red-boxed restart button within that menu.
Then, the Pi Node will automatically restart and synchronization will begin.
Synchronization will not complete immediately after restarting, so it’s a good idea to wait for about 10 minutes.
Manual Action ②: Restart the PC.
If the issue is not resolved with Action ①, the delay may be caused by something other than the Pi Node app.
After confirming that there are no network-related issues, try restarting your computer.
Above is the explanation of how to operate the Pi Node.
It turned out to be a long article, but I wrote it hoping it would help everyone with their operation.
Port forwarding is the most difficult part, but once you set it up, your PC will operate automatically, so please try your best to set it up.
How to Update the Node Version
The Pi Node was updated on March 15, 2024.
I have been running the Node for two years, and there have been several updates.
(It went from 0.4.5 → 0.4.9 → 0.4.10 → 0.4.11 → 0.5.0.)

A feature for automatic version updates was implemented in the Pi Node from the previous version.
Since version updates are done automatically, you will have the new version without even knowing it.
Installation files for older versions are basically not distributed, so you can continue operating without worrying by downloading from the official website.
Many reports of operational issues have emerged with version 0.5.0. Basically, I think fixes will be implemented if you wait, but if you are concerned, please refer to the following article.
Pi Node 0.5.0 Update: Operational Issues and Solutions
https://pinetwork.masters-all.com/node-050-troubleshooting-guide/
The Node software is updated automatically, but Docker is not updated automatically. If Node operation is unstable, you may be advised to update Docker in the Pi chat or community. In that case, please follow the steps below.
(The administrator’s Docker environment is 4.30.0 and is running the latest version of Pi Node.)
The update procedure is simple.
③ Delete the pinetwork data in Containers and images from the Docker menu. (It will be regenerated immediately even if you delete it.)
Containers
You can delete by pressing the trash can icon on the right. Although not in the screenshot, it is said that Stellar Dummy can also be deleted.
Next, delete the data in images.
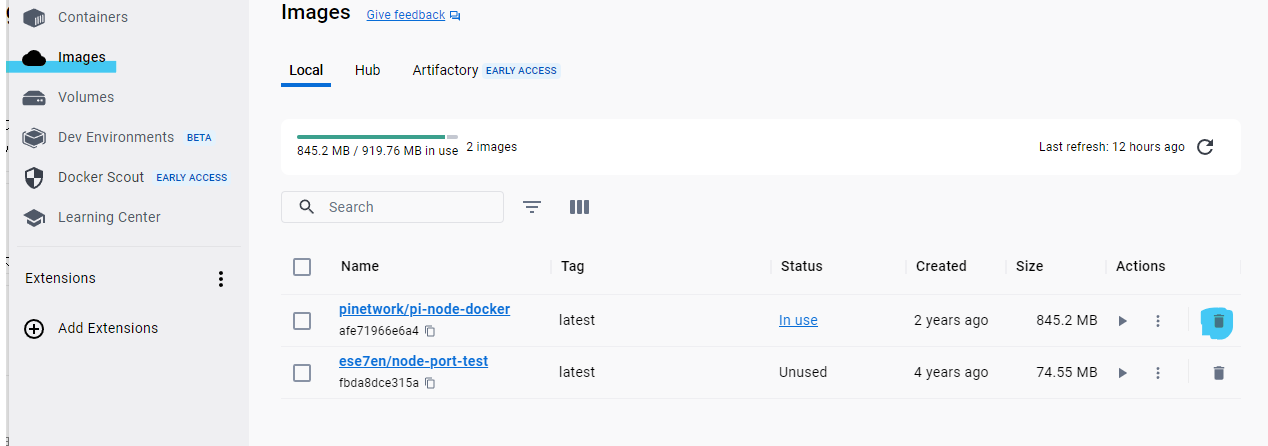
You will be asked for confirmation when deleting this.
Select Delete forever as is.

If the screen below ↓ appears, try closing the software completely or deleting Containers first before executing.

Once both are deleted, close Docker as well.
④ Launch the downloaded installation file and wait for a while.
After the version processing is done automatically, the software will launch automatically.
⑤ Launch Docker as well.
After that, just launch Pi Node as usual, and it will be in normal operation.
About Node Bonus
Addendum 2025/1/1
Even when running the Node, the phenomenon of Node bonuses not being awarded has occurred for the past month. Although the bonus is not being added, a message is displayed indicating that the bonus will be awarded retroactively, so it is recommended to continue running the Node.
Message Display Location
When you press the bell icon on the Pi Node, the following message is displayed.
Translation
Addressing Node Reward Issues
Release Date: December 12, 2024
We are currently addressing an issue where some node rewards are displayed as zero. Even if the reward is zero, statistical data regarding the node’s operation status is still being recorded.Furthermore, we aim to distribute past rewards retroactively.
Bonus: Node Bonus Calculation – What is CPU Factor?
I will describe this as a reference for choosing a CPU to aim for higher rewards. There is no specific recommendation for which CPU is best, so please view this for reference.
According to the Pi Network white paper, the “CPU Factor,” which is part of the node reward, is determined based on the computing power (CPU performance) provided by the node. By using a high-performance CPU, this factor increases, resulting in higher rewards. This is considered a design to incentivize node operators who provide better hardware to enhance the network’s processing power and stability.
However, the white paper and official announcements do not explicitly state detailed values or criteria regarding “how specific CPU specs affect the factor.” Therefore, the explanation below is based on general CPU performance trends and factors that can be reasonably inferred in the context of Pi Network.
Factors That May Affect CPU Factor
Since the CPU factor is said to depend on “computing power,” the following CPU characteristics are thought to have an impact:
-
Clock Speed
-
Clock speed (GHz) indicates the number of instruction cycles a CPU can execute per second. For example, a 5.0GHz CPU has higher computing power than a 3.0GHz CPU, which may result in a larger CPU factor.
-
Trend: CPUs with high clock speeds (e.g., Intel Core i9-13900K or AMD Ryzen 9 7950X) are advantageous.
-
Number of Cores
-
Multi-core CPUs can process multiple tasks simultaneously. If the Pi Network node utilizes parallel processing, a higher core count can improve computing power and potentially have a positive impact on the factor.
-
Trend: 8 cores or more (e.g., AMD Ryzen 7 series or Intel Core i7/i9 series) are advantageous.
-
Number of Threads
-
CPUs that can process multiple threads per core through Hyper-Threading (Intel) or Simultaneous Multi-Threading (AMD) improve efficiency. If this helps with network transaction validation, it may affect the factor.
-
Trend: 16 threads or more (e.g., Ryzen 9 5950X or Core i9-12900K) are advantageous.
-
Cache Size
-
CPU cache (L1, L2, L3) allows for fast access to frequently used data. A larger cache can improve processing speed and potentially contribute to computing power.
-
Trend: Large cache capacity (20MB or more, e.g., Ryzen 7000 series or Intel Alder Lake/Raptor Lake) is advantageous.
-
Architecture Efficiency
-
New architectures (e.g., Intel’s Alder Lake/Raptor Lake, AMD’s Zen 4) offer higher performance at the same clock speed compared to older generations (e.g., Intel Skylake, AMD Zen 1).
-
Trend: Latest generation CPUs (models from 2023 onwards) are advantageous.
-
Benchmark Scores
-
Higher scores in benchmarks that comprehensively evaluate CPU performance (e.g., Cinebench, PassMark, Geekbench) may lead Pi Network to judge the CPU as “high-performance.”
-
Trend: A PassMark score of 10,000 or more (e.g., Ryzen 5 5600X or higher, Core i5-12600K or higher) is a guideline.
What Specific CPUs Are Advantageous?
Since the specific requirements and algorithms of the Pi Network node software (Pi Node) are not publicly disclosed, it is unclear how much computing power is required. However, considering the requirements of typical blockchain nodes (transaction validation, data processing, network communication), CPUs like the following are likely considered “high-performance” and tend to increase the CPU factor:
Examples of Recommended CPUs (as of 2025)
-
Entry Level (Moderate Factor)
-
Examples: AMD Ryzen 5 5600X, Intel Core i5-12400F
-
Specs: 6 cores 12 threads, 3.7-4.6GHz, PassMark score approx. 20,000
-
Reason: High cost-performance and sufficient performance for basic node operation.
-
Mid-Range (Expected High Factor)
-
Examples: AMD Ryzen 7 5800X, Intel Core i7-12700K
-
Specs: 8 cores 16 threads, 3.8-5.0GHz, PassMark score approx. 30,000
-
Reason: Good balance of core count and clock speed, capable of handling medium-scale computational load.
-
High-End (Aiming for Maximum Factor)
-
Examples: AMD Ryzen 9 7950X, Intel Core i9-13900K
-
Specs: 16 cores 32 threads, 4.5-5.8GHz, PassMark score approx. 50,000+
-
Reason: Top-class performance, capable of handling large-scale transaction processing and network load.
Possibility of Server CPUs
If Pi Network emphasizes the stability of the decentralized network, server CPUs (e.g., AMD EPYC 7003 series, Intel Xeon Scalable) may also be candidates. These are characterized by a high core count (32 cores or more) and stability, which may be advantageous especially if aiming for a Super Node.
Trends and Notes
-
Trend: To maximize the CPU factor, CPUs with “high clock speed,” “multi-core/multi-thread,” and “latest architecture” are advantageous. Models from 2022 onwards (AMD Zen 4, Intel 12th/13th Gen) are particularly recommended.
-
Cost and Efficiency: High-end CPUs may increase rewards, but you need to consider the balance with electricity costs and initial investment. Since it is unclear how much Pi Network rewards are proportional to CPU performance, excessive investment carries risks.
-
Lack of Official Information: As of now (March 7, 2025), Pi Network has not published a specific formula for calculating the CPU factor (e.g., factor multiplier per score). The actual impact depends on Node software updates and Mainnet operation status.
Other
The home screen may be displayed as shown below, and the Node button may become unclickable. In that case, pressing F11 on the keyboard will switch to full screen display. This will make the Node button clickable. To return to the screen below, press the F11 button again.

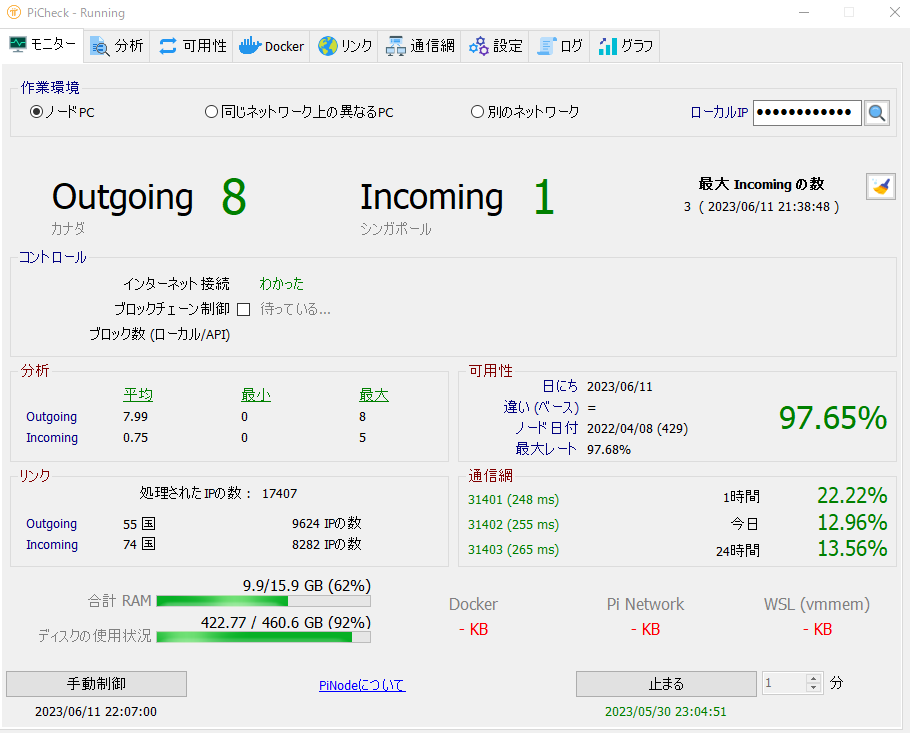
I wrote an article about the picheck software that helps with Pi Node operation.
If you like, please refer to this as well. It can help you detect Pi Node operation issues early.
https://pinetwork.masters-all.com/picheck/